Showing posts with label cheese. Show all posts

Tuesday, January 13, 2009

Mac and Cheese...The Ultimate Comfort Food

This is definitely NOT low carb. But sometimes one just has to indulge. There is nothing better, as far as I am concerned, when all the world seems to have gone to hell in a hand basket, than piping hot homemade mac and cheese. The stuff from the box is just pathetic when compared to the real stuff. When I was growing up my mom would make mac and cheese as a side dish to go with baked fish, usually perch or cod, and I really looked forward to the mac and cheese. The next day I would even eat it cold right out of the fridge. You certainly can't do that with the boxed mac and cheese. Now, I have to admit that for convenience sake I would use the boxed kind for my kids and to make into casseroles. But these days, I don't even buy the stuff. And you really have to love the versatility of mac and cheese. You can use just about any type of cheese, add meats, make it cheap or expensive. It's just a great dish to have in your repetoire. And so here's my version.

Mac and Cheese

8 oz. any short pasta cooked to just shy of al dente I used rotini
4 TBS. butter
4 TBS. flour
2 cups milk
4 oz. sharp cheddar grated
4 oz. Velveeta cubed
4 slices Swiss (I was adding ham so I thought "why not some Swiss." I had some for sandwiches)
1 tsp. dry mustard
dash of hot pepper flakes
salt and pepper to taste
2-3 cups cubed ham
1 cup dry bread crumbs
3 TBS. melted butter
a palm full of smoked paprika

Preheat oven to 350 degrees. Spray a 2 quart casserole dish with Pam. Melt butter in a large saucepan. Whisk in flour and let cook for 3 or 4 minutes. Add the milk, whisking to break down any lumps. Stir constantly until the sauce thickens. I usually do this over a medium heat. Don't be tempted to increase the heat or you run the risk of scorching the milk. Once the sauce has thickened stir in the salt, pepper, pepper flakes, and mustard. Then stir in the cheese. Turn heat to low and keep stirring until all the cheese has melted. Remove from heat. Mix the cheese sauce, pasta and cheese together either in a large bowl or, if your casserole dish is big enough, you can mix it together in that.

Now, for a crunchy topping! At Christmas, I bought loaves of French bread that I let set out to get stale. Then I cubed them and let them get even more stale. I used this for my stuffing and froze what was left. I pulled outt enough to make a cup of bread crumbs and pulsed the cubed bread in my processer. I then added the melted butter and paprika and sprinkled it over the mac and cheese. Bake for 30 minutes until bubbly. Mmm, mmm, mmm. Comfort food! Enjoy!

Wednesday, January 7, 2009

Cheese Crackers...Sort of

We all need to have crunch in our lives. Me, I live for crunch....peanuts, potato chips, pickles, ice cubes. Eating low carb can present a problem in that area. I crave the crunch of potato chips, but, alas, they are verboten. Thank goodness, one of my low carb/diabetic cookbooks has offered an amazing solution. Cheese crackers...literally. These crunchy morsels can double (or triple) as crackers, chips, and even bread. Just be aware that these do not necessarily have the same concistency as the afore mentioned yummies, just as spaghetti squash does not taste like its namesake pasta. But they are a good substitute. And, even better, they are so simple to make it's ridiculous. So here goes.

Cheese Crackers

1, or as many as you want to make, slice of American cheese....NOT American processed cheese or cheese food.You want the thick sliced stuff, not the thin individually wrapped stuff. I buy the big package of it at Costco. It is not always the easiest cheese to find. Just be sure to read the label. The cheese food will not work. Trust me on this.

a piece of parchment paper or freezer paper. I think in the long run freezer paper is more economical. The piece needs to fit in the microwave.

That's it, that' all you need. Crazy, huh.

Place the slice of cheese on the parchment paper or freezer paper (freezer paper needs to be shiny side up.)


Place in the microwave and cook on high for approximately 1 minute. My microwave runs pretty high, o for me 1 minute is perfect. Keep an eye on your cheese so that you don't cremate it. This is what it should look when it's done.


This is 2 full size pieces of cheese. Prior to cooking, these could be cut into smaller cracker or chip sizes. I used these to make a chicken salad sandwich. When using these for sandwiches, the crackers will be crumbly so hang on tight to your food! These are quite tasty and help to satisfy that crunch that we all so craze. Try these and Enjoy!

Thursday, October 9, 2008

Veggie Heaven...Roasted Veggies with Pasta

Just so you know, I haven't neglected my blog because I'm lazy, or because I have nothing to say. I've been a bit busy with worrying and doctor's appointments for my hubby. It turns out that little mass in his lung that I posted about a few weeks ago is cancer...a melanoma to be exact. Who knew that skin cancer can actually be on the inside of the body? There isn't anything on the outside to indicate that he had any problems. So anyway, we're dealing with that now. Waiting to hear about treatments. But since I have to cook, I might as well continue to post.
On to cheerier topics.

I have newly discovered roasting veggies. WOW!!! I love this way of cooking them. I seriously doubt I will ever pot a veggie again. I can't believe how tasty they are. So tonight I decided to combine them with pasta and cheese. I have to say this was really good. The recipe is pretty loosey goosey, but, then, that's what makes cooking so exciting!

Ingredients (subject to change depending on your taste)

2 baking sheets full of assorted veggies cut to uniform size....I used broccoli, zucchini, mushrooms, and red peppers but any of your favorites could be used...any squashes, parsnips, turnips, cauliflower, carrots. Well, you get the picture.
EVOO
kosher salt
rosemary or any other herb you like
5-7 large clove garlic chopped
3-4 cups baby spinach
about 1 TBS balsamic vinegar
2 cups grated mozzarella cheese
1 cup grated fresh Parmesan
1 pound pasta cooked according to package directions reserving 1 cup of cooking liquid
salt and pepper to taste

This is so super easy, and healthy to boot! Pre-heat the oven to 375 degrees. Adjust the oven racks to the center of the oven. You are going to need both racks.

Drizzle EVOO over the bottoms of the baking sheets and spread to ensure the sheets are thoroughly covered. Place the veggies on the sheets, drizzle more oil generously over them, sprinkle with the chopped garlic, herbs of your choosing, and kosher salt.


Place on 2 racks in the oven and cook for 30 to 40 minutes rotating the racks once

While the veggies are roasting cook your pasta, reserving a cup of the liquid. It's fun to use different shaped pastas for this dish. I used a radiatori. Place the pasta in a HUGE bowl. Quickly wilt the spinach in olive oil and the balsamic vinegar in a large skillet. Add all the veggies and the reserved cooking liquid to the pasta along with the cheeses and any salt and pepper you think you need (I didn't add any), and toss. And there you go! A healthy, delicious and economical meal. All you need (well, maybe not "need") is some yummy bread. Dinner!


This is really versatile. Tonight I sauteed some chopped chicken breasts seasoned with salt, pepper, grill seasoning and garlic powder in olive oil. After they were cooked on the outside I added about 1/2 cup white wine and cooked it until it was reduced a bit. Then I dumped it all into the leftover pasta from last night and heated individual portions in the microwave. And we still have enough for a couple of more meals. But my hubby says that is fine. He was very happy with this dish. If he will eat something more than twice, you know it's good. Enjoy!

Tuesday, September 16, 2008

Life and Magic Soup Mac and Cheese Soup

OK, I know that I haven't posted for a bit, but I have reasons. And I think they are pretty good ones. But I'll let you judge for yourselves.

Reason #1....Our oldest grown son has been living with us this summer as he fights oral cancer. He's done with treatments and now the healing begins. It's gonna take awhile, but he's got the stuff to kick this. On a side note...if you didn't watch the "Stand Up 2 Cancer" telethon, you missed something very special. Go there and donate. Anyway, cooking soups for him a
nd doc appointments, etc. have kept me somewhat busy with him.

Reason #2....I try to keep my adorable grandson one day a week to help out his parents.

Reason #3....It seems my husband was feeling neglected and developed a tumor that is hindering his breathing, so now we have all the doc st
uff to do with that coming up.

Reason #4....I work for myself as a private in-home tutor, and after taking most of the summer off for family issues I am trying to get build my clientele back to what it was.


As they say, "Man makes plans and God laughs." He must be really killing himself about now.

But amidst the chaos arose what my son calls "the magic soup." See, he had radiation on his neck and mouth and can only handle extremely pureed foods. Yummmm! He still has his taste buds, so I have diligently worked at trying to develop tasty yet smoooooth soups. As I was pondering what to make for him next my little brain had a thought. Mac and cheese are like the ultimate comfort soup, so why not a mac and cheese soup? And I did, and it was yummy, and it goes down my son's gullet with great ease. Thus, the nomer "magic soup."

Now, a few words of warning....this soup is EXTREMELY loaded with fat. That is by design. My son needs as many calories as he can get down. And so far, we have done well in that department. So, with that said, here's the how to of the soup.

Ingredients

1/2 lb. bacon

1/2 large onion sliced in strings
1 TBS. bacon fat (reserved from frying the bacon)
1 TBS. butter
2 1/2 qts. chicken broth or vegetable broth (boullion cubes work well for this)
1 box Dreamfields rotini (or any other small pasta...about 1 lb.)
3/4 cup butter
3/4 cup flour

1 qt. half and half or any type of milk you want (I am trying to calorie load)
1/2 cup mild cheddar cheese grated

1/2 cup sharp cheddar cheese grated
1/2 cup Parmesan cheese grated
1/2 cup Guyere cheese grated
1/2 pound Velveeta cubed

1 TBS. fresh savory minced
fresh grated nutmeg

fresh ground pepper

For efficiency, have all the cheese grated and herbs mince
d before you start.

Fry the bacon. When the bacon is done remove it to paper towels to cool while finishing the soup. Drain most of the bacon fat leaving about 1 TBS. Add 1 TBS. butter to skillet and the thinly sliced strings of onion. Caramelize the onion. While the onion is caramelizing, cook the pasta in chicken broth according to package directions. When the pasta is done D
O NOT drain. Just leave the pasta in the broth. You will wanted to cook the pasta al dente so it doesn't turn to mush.

Now some juggling comes into play. Before the pasta is fi
nished, make a roux of the butter and flour, then add the onions. Add the half and half slowly, stirring constantly. Cook and stir over medium heat until thickened. When thickened add to the broth and pasta. After these are mixed well, add the cheeses fairly slowly, stirring until melted. If it seems a bit thick you can add more liquid. Water seems to work just fine. At the end add the savory, chopped fried bacon, some grated nutmeg (don't get carried away with this...a little goes along way), and fresh pepper. Between the chicken broth and the cheese you most likely won't need to add salt.

This is one of those recipes you can really adjust to fit
your tastes. You can use any melty type of cheese, but be sure to include the Velveeta. That gives it the really smooth texture. I used the savory because it is growing in my little window herb garden, and it just smelled like it should go into the soup. The nutmeg really adds a nice touch. And be warned, this makes a huge batch of soup. Be prepared to give some away, although my son wouldn't let me. In fact, come Friday I have to make another batch. Enjoy!

Saturday, August 9, 2008

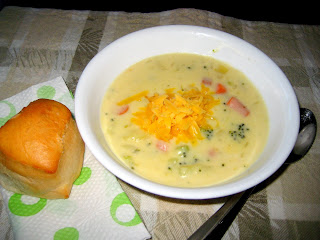
Something Yummy for My Tummy Cream of Broccoli Soup

OK, I know it's summer, and hot soup is not really on your minds. But just put these recipes away for when it's cold and blustery outside, and you need something to warm you from the inside out. I have a need to make these creamy fattening soups to keep a family member nourished while he is unable to eat basically solid foods. And I don't think there is any reason they can't be made tasty and functional for the rest of the family. And let me tell you, this is one of our all time favorites! I can't take credit for the recipe. I found it in one of my old cookbooks that my church published as a fund raiser. Heck, we all know how good some of those recipes can be! Even if it is warm out, you really need to try this one. So here we go.

Cream of Broccoli Soup


The Ingredients

3 cups diced raw potatoes
1/2 cup chopped onion
1 large head chopped broccoli
1 cup diced carrots
5 cups chicken broth
3/4 cup butter
3/4 cup flour
1 quart milk
8 oz. shredded sharp cheddar cheese

This soup is so easy it is ridiculous. First, I never peel the potatoes...except in this instance since I will be pureeing some of this. Another thing...if you don't have chicken broth you can certainly substitute bouillon cubes. For vegetarians, vegetable broth could also be substituted. And lastly, any type of milk could be used...skim, lowfat, half and half. It would just depend on how rich you prefer your soup.

Now to the making of it. Put all the veggies and chicken broth in a good size pot. Heat to boiling, cover and simmer until veggies are tender.

While the veggies are cooking, make a roux with the butter and flour. I am confident that most of you know what that is. But for those of you whom I have confused it simply means to melt the butter and then gradually add the flour whisking constantly until you have a smooth paste. Do this over a medium heat.


Then, again, gradually add the milk to the roux whisking the entire time. Continue cooking and stirring until the mixture is thickened.


Add the milk mixture gradually to the pot with the cooked veggies. Heat through until slightly thickened. Add salt and pepper to taste. Be careful with the salt as the chicken broth and cheese will have salt. And I like to use white pepper in this as it is a little milder in flavor and it isn't nearly as visible as the black.


Now comes the really yummy part....cheeeeesssseee. Everything is better with cheese. You could use any melty cheese in this and it would be yummy. So add the cheese and stir until melted.

And there you have it...a warm yummy comfort soup that is a meal in itself. Trust me, you will love this. The important thing is....I didn't lie. It really is easy, isn't it?!


Enjoy!