Saturday, August 30, 2008

Outing

Today was one of those days I needed to get out for a few hours all by myself. The weather was cool with the promise of sun, a perfect day for an excursion to the farmers' market in the neighboring almost metropolis.And it did indeed prove to be the perfect day. It takes about 45 minutes to drive there, park and walk to the market, and by the time I had done all that the sun had broken through the clouds. The sun was shining, people were meandering among the booths, children were laughing and begging for treats, and the smells and colors were almost overwhelming. Produce, of course, was in abundance everywhere. What is more beautiful than fresh produce?

Robust red tomatoes
Elegant rich eggplants

Juicy ripe blackberries...blackberry cobbler....mmmmmmm!


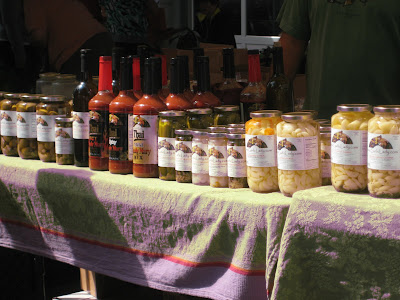
Of course, farmers' markets aren't just for fresh produce. Everyone gets into the picture with their wares.


My favorite booths, though, are the flower vendors.


Everyone seemed to be enjoying their
day.Check out her little ponies on top of her head...too cute.


Got my treat...pig's ear...mmmmmmm.

And I, too, came away with a few treasures of my own.
Herbs for an indoor herb garden
And, naturally, produce!

Tuesday, August 26, 2008

Zucchini Fries

Here's the thing. Due to a health issue, I am supposed to limit my carbs. Yeah, like that's going to happen everyday. But I try, I really do. At one point I was doing great with it and lost a nice amount of weight without feeling too deprived. And I have found some delicious substitutes for some of those carbs. Following is one of those. My hubby says they are positively addicting. And they are easy to make, and they are a great way to get kids to eat a veggie that usually causes them to gag. And, finally, it's a great way to use all that zucchini growing rampantly in your garden. (That was a lot of "and"s, wasn't it.)

Again, I really don't have quantities because it will depend on the amount you want to make and taste.

The Ingredients

oil for frying
2 zucchini
1 egg
1-1/2 cups Parmesan...the cheap kind in the can is fine for this
cayenne pepper, sea salt, fresh ground pepper, paprika all to taste


This is so easy that once you have made it you won't ever need the recipe again.


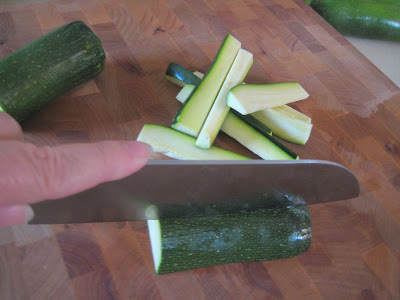
Put about an inch of oil in a skillet and heat on medium to medium high. Wash the zucchini, cut off the ends and then cut into fries.


In one bowl whisk the egg until blended. In another bowl mix together the Parmesan cheese and spices.

Dip the zucchini fries into the egg and then into the cheese mixture. Place in the hot oil. Cook until golden, usually just a couple of minutes.

Drain on paper towels, serve hot and try not to go overboard eating them before you serve them to the rest of your family.

I served these with stove top grilled pork chops and sliced tomatoes. Very low carb and very yummy.

As a side note, I have used the egg and cheese coating on pork chops and chicken, and it is delicious! If you are trying to be fat conscious don't try baking food coated with this mixture. It really doesn't work the same. Using canola oil or light olive oil is actually fairly healthy. Just be sure to drain well. Enjoy!

Monday, August 25, 2008

Postscript to Previous Post....Should I be Embarrased

I was just checking emails, and there was one from the Rachel Ray club. And lo and behold, Thursday she is making a dish very, very similar to mine. I swear I did not steal it!! I was just playing around cooking yesterday. So, try hers, too. I am sure it is "yummo".

Cherry Cherry Tomatoes, Basil Pasta

Last Saturday I was feeling the need to get out of the house. After some triple digit heat the weekend before and then a deluge of rain, this weekend was gorgeous. My choice of outing was to a couple of very local farmer's markets...neither of which is much to shout about. However, I did score a few nice veggies. Next Saturday I am going to venture out to the huge farmer's market that's in the metro area about 15 miles from here. It is a great market with loads of produce, crafts and food booths. I'm hoping to load up on some great tomatoes and peppers, my goal being to make spaghetti sauce and freeze it for quick meals this fall.

Back to this past Saturday's treasures. One of the purchases I made was a basket of cherry tomatoes. They were about half the price as in the grocery store...big surprise. I decided to experiment with some ideas I had seen on cooking shows. What I created was like a pasta Marguerite. If you are familiar with a Marguerite Pizza you know that it is tomato, basil, and fresh mozzarella. I thought, "Hmmm...why not do the same thing with pasta." It's probably been done, but this is my take on it. Here we go.


The Ingredients

1 basket cherry tomatoes You could use grape, strawberry, or any small tomato

extra virgin olive oil

several cloves of garlic minced
kosher salt

fresh ground pepper
spaghetti
bacon
shallot
balsamic vinegar
basil
fresh mozzarella cheese
sea salt
fresh ground pepper

I know, I know. There are olives in the picture of ingredients and no salt and no pepper, and not shallots. You have to understand that this was free wheelin' cooking. I was adding and subtracting as I went along. Olives subtracted, salts, pepper, shallots added. Call it new math. Also very obvious, there are no quantities listed. I did everything to taste. Someday, if requested and pretty please is added, I will figure out how much of everything I used. Until then...do what suits you.

Here's what I did. After washing and stemming the tomatoes, I placed them on a cookie sheet that had olive oil drizzled on it. I then drizzled olive oil and minced garlic over the tomatoes. What worked well for me was to put the minced garlic in the oil and then spoon it over the tomatoes. After I had sprinkled them with kosher salt and fresh pepper, I placed them in a 425 degree oven until they burst...about 20 minutes or so. Just keep an eye on them so they don't burn. They should look kind of like this when they are done. I am telling you, these are so yummy!
While the tomatoes were roasting I fried 3 slices of chopped bacon. I drained all but about a tablespoon of the bacon grease and then sauteed 1 minced shallot in the drippings. During this time the spaghetti was also cooking. I cooked a 1 lb. box of the Dreamfields pasta, but probably used about 2/3 of it. When you drain it be sure to save a bit of the pasta water to add to the mixture later.

When the tomatoes and pasta were done, I dumped them into a large bowl. To this I added, oh, say, 6 oz. of fresh mozzarella. This stuff is heavenly. But, be aware, you cannot grate it. It is much softer that the stuff you get in the regular cheese section of the dairy case...where you get the standard cheddar, jack, and American processed stuff. You will find this in the fancy cheese section. Try it on pizza or lasagna. It is totally to die for. OK, now that I am done waxing eloquent about cheese, the rest of the story. I sliced it and tore the slices into bits. Then I finally added chiffonaded basil. At this point I added a little of the water from the cooked pasta, between maybe 1/4 to 1/2 cup. I then mixed that all together and let it set while I made the dressing.

Here is what really made it yummy. I mixed together about 1/4 cup of olive oil, 1/8 of a cup of balsamic vinegar (I'm guessing here...just make sure it's a 2 to 1 ratio of oil and vinegar), the chopped bacon and the sauteed shallot. I whisked them together, poured it over the pasta mixture, added sea salt, fresh ground pepper, and tossed.

I have to admit, it came out quite good! I was originally going to make it more like a pasta salad, thus the olives, but it took on a life of it's own and became a hot pasta dish. But you could obviously make this a cold dish also. I would add the black olives and trade out the fresh mozzarella for the traditional grated type stuff and maybe some Parmesan. This is one of those dishes that can be very versatile and subject to taste. The amount of basil and cheese and dressing is up to you. Play with it, and let me know what variations you come up with.

I served this with a roasted chicken from the supermarket, and it made a nice light meal that wasn't extremely labor intensive...well, maybe a little.


Now, stayed tune to see what I do to zucchini.


Wednesday, August 20, 2008

Kitchen Dreams

Warning...the following entry has no ingredients, recipes, or any type of food references. But it does have everything to do with cooking and cooking spaces.

My son (who is a grown man) and I were watching "Ratatouille", the movie, the other night and it set me to thinking. (That's a phrase that has been known to send shivers up my husband's spine.) Anyway, I digress. The premise of the deceased chef Gusteau was that anyone can cook. I, too, pretty much believe that anyone can learn to cook given the opportunity and the right tools. Tools are important!! But what I have also come to learn is that you do not need a gourmet kitchen to cook well.

I have dreamed of a gourmet kitchen with granite countertops that won't quit, a 5 or 6 burner gas stove, the extra little sink, the pots hanging above the island, and tons of cupboards for all of my stuff. Alas, it's never going to be in the cards.

My little cottage is only 1150 square feet which doesn't translate into any normal size kitchen. You are about to see what I'm talking about.
That's it. These pictures are sequential from left to right. On the back side of the island is my hubby's piano, music cabinet and telephone table. So it really is a jampacked room.

I have decided that whoever designed this house must have never cooked a meal. There is very little counter space as well a totally impractical amount of cupboards.

Hubby and I went to work getting creative. We had at one poi
nt watched more HGTV than anyone has a right to. One of our favorite shows was "Design on a Dime" because, frankly, that's about all we have. If you noticed we imported a free standing cupboard...and by "free" I mean it was literally free... for dishes, and a bookcase that we use for cookbooks, serving bowls, casserole dishes, and knick knacks (is that a compound word?). We painted using color which actually really made things pop. I made curtains, and recovered the chairs from the dining set we inherited from hubby's parents. Threw in a few coordinating rugs and "Voila"...new kitchen. Not gourmet, but comfortable and functional. The saving grace is the nice sized island. If that hadn't been there I really would have had to get creative. The one thing we don't have room for in the kitchen is a pantry. That little problem was solved by using another free standing cupboard in the garage. Thank goodness it's a small house and not much of a trip to the garage!

All in all I am pretty happy cooking in my cozy little kitchen
. I've learned to make due with the space I have. I have most of the tools I want...although a trip to Sur Le Table or Bed, Bath, and Beyond always thrills me!
As they say..."When life hands you lemons make lemonade."

Sunday, August 17, 2008

Mexican Lasagna


I know this is not a soup recipe. But it so yummy that I had to share. And I am not even going to give you the recipe. You have to do some work yourselves, you know. A little background...my husband's niece posted on her blog some months back an absolutely delish recipe for potatoes and the site that she found it on. And it is truly a treasure...the site, that is. You so have to check it out. The site is The Pioneer Woman. You can link to it from my links on the right. But I will give you the link for the recipe. Are you ready? Here it is...Mexican Lasagna. Now be warned...this is a labor intensive recipe, but so worth it. It would be great for a family dinner or a potluck. I plan on making this a staple in my recipe box. Enjoy!

Thursday, August 14, 2008

Minestrone

Italian for "big soup" is minestrone. There seems to be no standard recipe for this staple of Italian cuisine, probably because it was considered a poor man's meal made from whatever was available in the garden. It can be made with or without meat. The recipe I use is one I have tweaked a bit that I found in a vegetarian cookbook from Sunset magazine. It is wonderfully hardy and flavorful. And very versatile.

This time I don't have a picture of the ingredients. I took the picture and documented the whole procedure with more pictures. Then I loaded the pictures on the computer, then I deleted them (clumsy fingers) and when I downloaded them again to the computer the one of the ingredients was gone. So, I'm a technitard...I admit it. That means you guys are going to have to figure out what the ingredients are from this picture.

Just kidding!

The Ingredients


3 TBS. olive oil
1-2 onions chopped
3 large cloves garlic, minced, grated or pressed
6 cups chopped fresh veggies...here's what I used
zucchini, yellow squash, carrots, turnips, potato,
green beans. You could also use celery, fresh peas,
basically anything in your garden
1 can kidney beans or white beans
1 can garbanzo beans
8 cups vegetable stock (I use bouillon cubes)
1 tsp. each oregano, basil, rosemary (all dry)
6 oz. can tomato paste
1 cup small pasta
2 cups shredded cabbage
salt and pepper to taste
Parmesan cheese for topping the bowls of soup

This again starts out pretty much the same way as my other soups with sauteeing the onion and garlic in a large soup pot about 5 minutes or so. Something I think a person should always keep in mind when making soup is that nothing is set in stone (unless you are making stone soup...I know, I know). I firmly believe that making soup requires intuition and an understanding of what flavors work together. I give measurements...but I rarely measure. That's probably why I like making soups! Less work. Alright, back to work.

Now that the onions and garlic are all yummy, dump in the broth, the beans with juice, all the veggies, and the spices.
Bring to a simmer, lower heat, cover and cook for 30 minues.
Stir in tomato paste and pasta and continue to cook for about 15 minutes, until pasta is tender.

Now dump all that pretty cabbage into the soup and cook until just wilted. You could also use spinach, chard or kale. It is all in what you prefer. Salt and pepper to taste.
Ladle into bowls, top with fresh grated parmesan, and serve with a nice crusty bread. Salut!


Monday, August 11, 2008

Split Pea Goodness

Yeah, yeah, yeah...split pea is not everyone's cup of tea...or bowl of soup as it may be. But trust me when I say that this is truly flavorful and filling. Add some sweet warm cornbread dripping with melting butter and you have a very satisfying lunch or dinner. My family really likes this soup!

The Ingredients

5-6 cups water
1 1/2 to 2 lbs. ham shanks
4 TBS. butter or olive oil or combination of the two
1 medium onion chopped
1 cup chopped carrot
2 stalks chopped celery
1 lb. dry split peas
1/2 tsp. marjoram
pepper to taste

The thing I really like about this soup is how easy it goes together. But you do have to be patient because the smoky rich flavor comes from cooking the shanks for 1 1/2 to 2 hours in the water. Believe me, though, when I tell you it is so worth the wait. So, put those shanks in the water, cover and simmer on a low heat until the meat pulls away from the bone.

When the shanks are done remove them from the water...and save that water, which is now a ham broth...and strip the meat off the bones. Discard the bones, fat and rind. Chop the meat into small pieces and return to the broth.

Now saute the vegetables in the butter/olive oil for 5 minutes.


While the veggies are cooking, wash the peas, removing any stones that might be in them.


I was having such fun taking pictures of the peas that I just kept going. Aren't they fun?! OK, back to soup. Add the veggies, peas, marjoram and pepper to the meat and broth. Due to the ham this really doesn't need any salt. If needed add more liquid. I use chicken broth or water or a combination of the two.

Let this cook uncovered until all the veggies and peas are very tender, adding liquid as necessary. I usually cook it about 1 hour. The thickness of the soup is totally whatever your preference is.

Setting this photo up I just had to make some cornbread to go with. It is the best!!! Add a dolop of sour cream and you are set. OK, I'm eating. Can't resist. Aren't you jealous?


MMMmmmmmm......good! Slurp, slurp.

Saturday, August 9, 2008

Something Yummy for My Tummy Cream of Broccoli Soup

OK, I know it's summer, and hot soup is not really on your minds. But just put these recipes away for when it's cold and blustery outside, and you need something to warm you from the inside out. I have a need to make these creamy fattening soups to keep a family member nourished while he is unable to eat basically solid foods. And I don't think there is any reason they can't be made tasty and functional for the rest of the family. And let me tell you, this is one of our all time favorites! I can't take credit for the recipe. I found it in one of my old cookbooks that my church published as a fund raiser. Heck, we all know how good some of those recipes can be! Even if it is warm out, you really need to try this one. So here we go.

Cream of Broccoli Soup


The Ingredients

3 cups diced raw potatoes
1/2 cup chopped onion
1 large head chopped broccoli
1 cup diced carrots
5 cups chicken broth
3/4 cup butter
3/4 cup flour
1 quart milk
8 oz. shredded sharp cheddar cheese

This soup is so easy it is ridiculous. First, I never peel the potatoes...except in this instance since I will be pureeing some of this. Another thing...if you don't have chicken broth you can certainly substitute bouillon cubes. For vegetarians, vegetable broth could also be substituted. And lastly, any type of milk could be used...skim, lowfat, half and half. It would just depend on how rich you prefer your soup.

Now to the making of it. Put all the veggies and chicken broth in a good size pot. Heat to boiling, cover and simmer until veggies are tender.

While the veggies are cooking, make a roux with the butter and flour. I am confident that most of you know what that is. But for those of you whom I have confused it simply means to melt the butter and then gradually add the flour whisking constantly until you have a smooth paste. Do this over a medium heat.


Then, again, gradually add the milk to the roux whisking the entire time. Continue cooking and stirring until the mixture is thickened.


Add the milk mixture gradually to the pot with the cooked veggies. Heat through until slightly thickened. Add salt and pepper to taste. Be careful with the salt as the chicken broth and cheese will have salt. And I like to use white pepper in this as it is a little milder in flavor and it isn't nearly as visible as the black.


Now comes the really yummy part....cheeeeesssseee. Everything is better with cheese. You could use any melty cheese in this and it would be yummy. So add the cheese and stir until melted.

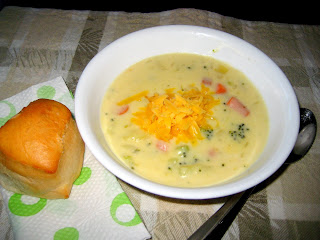
And there you have it...a warm yummy comfort soup that is a meal in itself. Trust me, you will love this. The important thing is....I didn't lie. It really is easy, isn't it?!


Enjoy!